StackSymbol®-Photo(Beta)
StackSymbol®-Photo combines photo, information and map to show and tell your story. It is a photo display and sharing software.
(For free download,
click here)
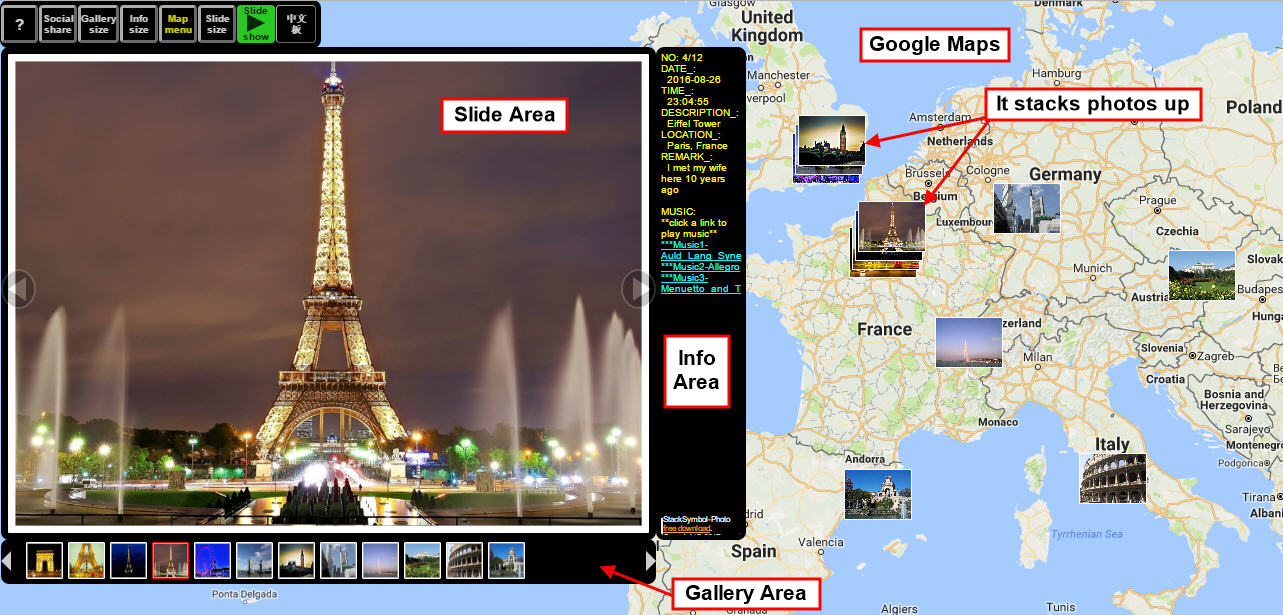
Figure 1: How a typical photo display (created by StackSymbol-Photo) looks like
I. Why StackSymbol®-Photo?
Everyone has memorable moments in life. One usually takes photos to remember them. Although a photo itself can tell what happens at that moment, however, it may need other related information (date, time, where, description, remark, supporting document, sound, image, etc.) to bring that moment into better perspective. StackSymbol-Photo enables you to create a photo display (with up to 50 photos) to show and tell your story by combining photo, information, and map, as described below:
A. Select photos from many sources
You can select photos from:
1. Local computer
2. Facebook
3. Google Drive
4. Amazon Web Services Simple Storage (AWS S3)
5. An input file in any of the following formats: Comma Separated Vales (.csv), dBase (.dbf), Access (.mdb), Excel (.xls), and XML (.xml)
B. Display information related to each photo
1. The software automatically extracts date, time, location, description, etc. from each photo file, if the file has such information.
2. You can add other information to each photo, in addition to the ones listed in 1.
3. You can add one or more links to each photo, including but not limited to, music, video, image, file, webpage, website, etc. That is,
you can link to anything in the Internet.
4. The information (items 1, 2, and 3 above) will appear on the same screen, along with the associated photo. That is, your audience will see the photo
plus the information at the same time.
5. You can edit or hide any or all information listed above.
C. Display photos on a map
1. It displays photos on Google Maps.
2. The software automatically extracts GPS coordinates (latitude and longitude) from each photo file, and use the extracted latitude
and longitude to locate the photo on map.
3. If a photo does not have GPS coordinates, you can add coordinates or other location information to it. If you add coordinates
(latitude and longitude), the program will use them to locate the photo on map. If you add other location information, such as street, city, state, etc.,
the program will first convert them into latitude and longitude and use the converted latitude and longitude to locate the photo on map.
4. You can replace any or all extracted GPS coordinates with you coordinates or location information, for privacy concern.
5. If two or more photos are located at the same location, the program stacks the photos up, creating a 3-D view of stacks of photos on map.
D. Display photos in a slide show and in a gallery
Refer to II. Features of Your Photo Display below for more details.
E. Share your story in smartphone, tablet and personal computer
1. The software creates an output file, which is an html file. This html file contains everything needed for your photo display.
2. The software also creates a link to this output html file. You can sent or email this link to anyone.
3. Anyone who receives the link and clicks it, he or she will see your photo display. If the link is clicked in a smartphone,
tablet or personal computer (pc), your photo display will be shown in the smartphone, tablet or pc respectively.
4. A person who views your photo display will have the features as described in II. Features of Your Photo Display.
F. Share your story in social media
1. You can share the photo display with social media, including Facebook, Google+, Twitter, WhatsApp, WeChat, Line, etc.
2. For example, when a person who is viewing your photo display clicks the "Social share" button and then the "f" button on the screen, the photo display will be posted on the viewer's Facebook account (after the viewer has login). The viewer can then view the photo display from his/her Facebook account, or can share the photo display with other Facebook users.
3. Other social media will work similarly as shown in the above example.
4. A person who views your photo display will have the features as described in II. Features of Your Photo Display.
go to top
II. Features of Your Photo Display
Figure 1 shows how a typical photo display (created by Stacksymbol-Photo) looks like.
1. Your audience will see photos, information related to each photo, and Google Maps on the same screen at the same time.
2. The photos will be displayed as a slide show in the "Slide Area". The information for each photo will be displayed in the "Info Area".
3. Each photo will be plotted at the location where the photo is taken (or at the location where you have assigned) on Google Maps. In addition, each photo will be listed in the "Gallery Area".
4. The "Slide Area", "Info Area", "Gallery Area" and Google Maps will all appear on the same screen at the same time.
5. Your audience can do any of the following at any time when viewing your photo display:
a). Click the "Slide Area" to see a photo in full-screen size; click it again to return to the original size.
b). Save any photo (by right-clicking it or touching-and-holding it).
c). Stop/start the slide show. If the slide show is stopped, viewer can go to next/previous photo manually by clicking a button or swiping the "Slide Area".
d). Change the speed of the slide show.
e). Set photo in the "Slide Area" to a desired size.
f). As each photo appears in the "Slide Area", information related to each photo also appears in the "Info Area".
g). Increase the "Info Area" size and/or the font size of its contents so that information can be seen clearly along with each photo.
h). Decrease the "Info Area" size and/or the font size of its contents so that more screen space can be used for photo and/or map.
Viewer can reduce the "Info Area" size to zero.
i). If you have added a link to a song for a particular photo, while the photo is appearing in the "Slide Area", the song's link will also be
appearing in the "Info Area". If viewer clicks this song's link, it will play the song immediately. Hence viewer can see your photo and
listen to a song at the same time.
j). Similarly, if you have added other links (including but not limited to video, webpage, file, other photo, etc.), while the photo is appearing
in the "Slide Area", the added links will also be appearing in the "Info Area". If viewer clicks an added link, it will
execute the link. Hence you can link your photo to anything available in the Internet. This greatly enriches your photo display.
k). Increase/decrease the size of each photo plotted on Google Maps.
l). Increase/decrease the height of each stack of photos on map.
(If 2 or more photos are at the same location, the program stacks the photos up, creating a 3-dimensional view. A location with
higher stack of photos will have more photos taken (or assigned to) at that location. Increasing the height of a stack will make a photo
(within the same stack of photos) more visible, because it will not be blocked by the photo above it.)
m). Click a photo on the map to display the photo in the "Slide Area" and the photo's information in the "Info Area".
n). Zoom-in, zoom-out, and go anywhere within Google Maps, because the photos are plotted in a real Google Maps.
(Note: On touch screen, use 2 fingers to move map.)
o). Increase the "Gallery Area" size so that all photos can be listed within the gallery.
p). Decrease the "Gallery Area" size so that more screen space can be used for other purpose.(Can decrease to zero size)
q). Click a photo on "Gallery Area" to display the photo in the "Slide Area" and the photo's information in the "Info Area".
r). Click the "Social share" button on the screen, then click "f" (or "G+" or Twitter) button to share the photo display with Facebook (or Google+ or Twitter).
III. Sample Outputs
A. OutputA
1. Click here or click here to see the sample photo display.
2. After the photo display appears on the screen, you can test its features by following items II.5.a) to II.5.s), under II. Features of Your Photo Display.
3. Click here or click here to see the input data file (in Excel format) for creating the sample photo display. You can input this
data file to your StackSymbol-Photo to create similar result. Or, you can run your StackSymbol-Photo and follow the "Step-by-step run-through with sample data" to create similar result.
B. OutputB (OutputA + revised location + added information)
1. Click here or click here to see the sample photo display.
2. This output is the same as the one in A, except that: (a) The locations of the first 4 photos (photos of the US Capital
and the Monument) has been corrected. (b) The texts "Washington, D.C." have been added to the first 4 photos (refer to "Location_" in the "Info Area"
for the first 4 photos, when viewing the photo display. (c) The texts "I met my wife here" have been added to the first photo (refer to "Remark_" in the "Info Area"
for the first photo, when viewing the photo display.
3. After the photo display appears on the screen, you can test its features by following items II.5.a) to II.5.s), under II. Features of Your Photo Display.
4. Click here or click here to see the input data file (in Excel format)
for creating this sample photo display. You can input this data file to your StackSymbol-Photo to create similar result.
Or, you can run your StackSymbol-Photo and follow the "Step-by-step run-through with sample data" to create similar result.
IV. Computer Requirements
A. To create your photo display using StackSymbol-Photo
You need a computer with Windows 7 or 10.
B. For a viewer to see your photo display
A person who views your photo display needs:
1. A smartphone, tablet or personal computer with any browser.
2. Google Maps (for displaying photos on map).
V. Beta Testing
1. We deeply appreciate it if you are willing to be a beta tester, to help us improve the software.
2. Because the software is free, we will not be able to provide financial incentive to beta testers. However, you will be rewarded with joy by helping us and everyone on earth to make this world better.
3. To be a beta tester, simply download the software and use it as usual. If you encounter any problem, or if you have any comment or suggestion, please email to:
stacksymbol@jmwEngineering.com
VI. Software Download
For free download, click here, and use it to create your own photo display.
Quick way to create your own photo display and to share it, in a few minutes:
(It assumes you have installed StackSymbol-Photo and a Google account*.)
A. Create your photo display:
1. Put your photo files in local computer.
2. Run StackSymbol-Photo.
3. Click 'Next' in the first screen (make sure A.A1 = 'Local computer' and B = 'Create photo display').
4. Select photo files from computer, then click 'Open'.
5. Follow instructions to click 'Yes' or 'No' or 'OK' for 5 or 6 times. Your photo display will appear on the screen.
(During this step, first time user has to login to Google account and to allow StackSymbol-Photo to access the account*.)
*For use in Mainland China, it does not need a Google account.
B. Share your photo display:
1. Click 'Social share' button from the display created in A.
2. Cick email button or one of the social media buttons to share it.
VII. Feedback
1. We are always trying to improve. We treasure your comment.
2. If you have comment or suggestion, Please:
(a) Email it to: stacksymbol@jmwEngineering.com
(b) Or, put your comment in the "Post a new comment" area below and then click the "Submit Comment" button to submit it.
(c) If you use the "Submit Comment" button, it will be posted in the Comment area.
VIII. Other Software by JMW Engineering, Inc.
Click here
go to top
Privacy Policy
Copyright © 2019, JMW Engineering, Inc. All rights reserved. StackSymbol® is a registered trademark authorized for use by JMW Engineering, Inc. Protected by U.S. Patent 6104410